ISO-22476-1:2022. An instrument is only as good as its calibration! (…and QC procedures)
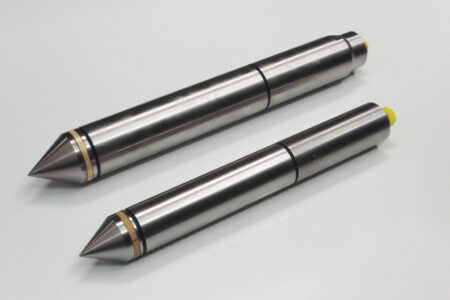
We are very pleased to announce that Lankelma is now able to perform fieldwork and calibrate cone penetrometers compliant with the new and rigorous ISO-22476-1:2022 (BS EN ISO 22476-1:2023) standard for the CPT titled “Electrical cone and piezocone penetration test”.
Lankelma’s CPT measuring capability has become second to none in the last 7 years…and thanks to the latest ISO standard, it has become better! Back in 2017 our Geotechnical and Calibration Engineers were unsatisfied with the lack of detailed calibration uncertainty data for cone penetrometers, and to address this, we started calibrating to ISO:376, intended for reference force proving instruments, and quickly learned about our true measuring capability, particularly in the very low range (cone resistance < 1 MPa). At the same time we began to use penetrometers with temperature sensors at the load cells, and with that capability came calibration of load cell temperature response and temperature correction methods, making it possible to obtain highly repeatable results in very low strength soils. Similarly, the ISO-22476-1:2022 calibration procedure is also closely modelled on ISO:376, with a comprehensive uncertainty budget, a strong focus on verification of temperature effects, and significant additional information relevant to the performance of cone penetrometer sensors. This existence of a specific penetrometer calibration procedure in ISO:22476-1:2022 is a notable change from the now withdrawn 2012 version.
The ISO-22476-1:2022 calibration procedure goes far beyond ‘normal’ penetrometer calibration, providing sensor uncertainty values for each reference load step and additional information relating to verification of temperature influence on force and pressure sensors and temperature influence correction methods, nominal bending influence, direct measurement of unequal end area effects and subtraction errors. This level of detail provides near complete transparency in the measuring capability of individual instruments and, subject to the outcome of the calibration, exposes the potential of penetrometers to measure low strength soils with low uncertainty – even for high capacity instruments.
Still, no matter how well a cone penetrometer is calibrated, leveraging its full capability relies on diligent performance of field QC procedures. Three noteworthy field procedures are now required by the ISO standard:
- Acquisition of stabilised zero values (baseline values) recorded for 60 seconds, at the start and end of each test, to verify sensor stability with respect to temperature change and random fluctuation.
- Cone dimensional measurements for surface area calculation (for precise calculation of pressure) and tolerance conformance for each test.
- Verification of automatically registered depth against true penetration length assessed by rod counting, at 5 m intervals.
These are helpful and likely overdue routine implementation. However, the standard does not require management of penetrometer temperature in-ground (using short temperature dissipation pauses) on encountering low strength soils, or when low strength soils are expected, it is only discussed as a potential strategy without any benefit in terms of test categorisation. From inspection of the temperature influence verification of the calibration certificates, discussed below, it is evident that this procedure is beneficial, if not necessary, when temperature changes are significant, and the soil strength is low. This temperature management strategy is important from an efficiency perspective, as it facilitates the use of high-capacity penetrometers in mixed soil profiles, including dense/stiff and low strength soils, and thus avoids the much larger expense of early refusal and re-testing with a lower capacity penetrometer which has essentially the same calibration uncertainty (at least for Lankelma’s low capacity penetrometers), but less affected by temperature change. We will explore this in more detail in the future.
What does the calibration look like, and how do Lankelma’s standard cones perform?
Calibration uncertainty
The snippet below shows the expanded uncertainty results for tip (cone) resistance for a standard 100 MPa capacity penetrometer, together with the penetrometer ‘class’ uncertainty limits, as defined in the ISO standard. In general Lankelma’s standard cones will meet class 0 in terms of expanded calibration uncertainty, with some falling within class 1.
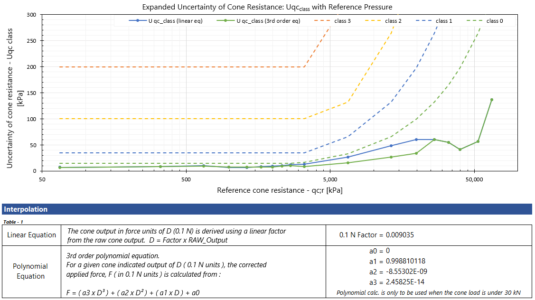
This method of conveying calibration results, with emphasis on uncertainty, is clearly much more valuable to the reader than a straight-line plot of measured values with reference values, which contains essentially no useful information aside from simple proportionality.
Temperature influence
The influence of temperature change on load cells and pressure sensors is the single largest contributor to CPT measurement error, and for the ISO calibration it should be the primary point of focus for those who are reviewing a calibration certificate.
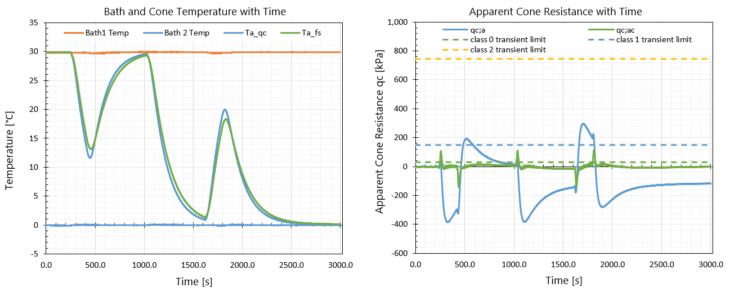
Temperature influence verification is comprehensively handled in the standard, with the cone subjected to a series of sudden changes of ambient temperature set at 0 and 30 degrees, which is a magnitude consistent with highly unfavourable testing conditions. The certificate extract below shows the temperature of the cone load cell during the heating and cooling process in the left had graph, and the resulting apparent cone resistance before correction (qc;a) and after correction (qc;ac) in the right hand graph. This information is highly valuable when assessing the likely error (or residual error after correction) associated with the reported temperature change during a test.
In this example it can be seen that without a method of modelling the temperature error and subtracting the predicted error from the results, or at least careful management of temperature during testing, the errors due to temperature influence could be very serious. Overall, the correction of apparent resistance performs very well, with the exception of short spikes of around 20 s duration immediately following the change in ambient temperature and reversal of temperature gradient, where the apparent resistance after correction (qc:ac) exceeds the class 0 transient temperature error limit line. However, because the error is primarily a function of the rate of temperature change, peak errors of less than 10 kPa can be achieved by simple management of temperature during the test (as discussed above), such that the maximum rate of temperature change at the load cell does not exceed c. 1.2°C.m-1.
Stability verification
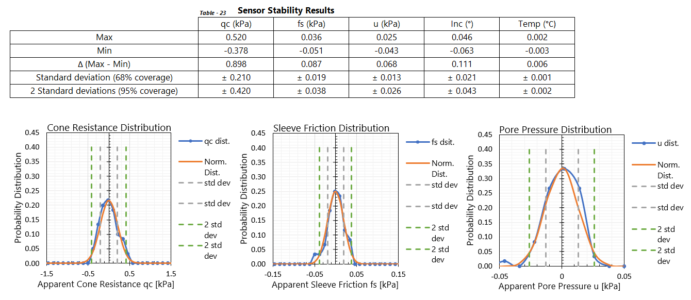
Although not required by the standard, a sensor stability verification has been included in the certificate to serve as a baseline comparator for the field stability verification values obtained before and after each CPT (required by ISO standard), which may be influenced by additional electrical noise (particularly with the cone above ground) and mechanical vibration, amongst other things.
Penetrometer classification
To alleviate the burden of understanding each aspect of the calibration and verification results, the calibrated cone is assigned penetrometer ‘class’ number from 0 (best) to 4 (worst). Lankelma present the classification for each parameter considered in the assessment, and then an overall classification for each sensor, as shown here:

This method of presenting the results is useful, allowing acceptance or rejection based on balance between measurement capability and durability with respect to the anticipated geology.
It is also useful to present classification for each sensor, where a single independent sensor of secondary importance to the design problem (usually pore pressure or sleeve resistance) causes a non-conforming classification, and may be disregarded if a more durable penetrometer better meets the objectives of the investigation.
Other aspects
We have not discussed other aspects of the calibration here, but merit worthy additions include verification of bending effects and requirement for pressure vessel determination of unequal end area effects associated with differential pore pressures acting on horizontal faces of the sleeve and cone.
Have we deviated from the standard?
Field procedure deviations:
For on-land work we have implemented some optional tweaks to the ISO field procedure, which can be adjusted as necessary, but are generally required to avoid excessive loss of productive time to repeat QC procedures when tests are relatively shallow and in quick succession. These include:
- Delaying repetition of zero load output stabilisation to ground temperature (c. 13 mins) until at least 30 meters of testing since the procedure was last performed, or else triggered by exceedance of a threshold zero drift. In this way stabilised zero values can be applied to multiple short tests, preferentially to the application of non-stabilised zero values.
- Delaying repetition of dimension measurements until at least 30 m of testing since the procedure was last performed, or else after change of components due to damage.
By default, cone and sleeve diameter measurements will continue to be performed at a single diametrical location at each prescribed axial position, rather than at three diametrical locations for each axial position. The ISO standard only requires dimension measurements for calculation of pressure for class 0 penetrometers only, but this source of uncertainty exists equally for all penetrometer classes and at all measured values of cone and sleeve resistance, so on this basis it makes sense to do this regardless of penetrometer classification.
To date, a pragmatic approach has been well received for land CPTs, where it is recognised that minor data error reduction at the expense of reduced production and increased geotechnical risk benefits no one, for a given budget, and an optimum should be sought.
Calibration deviations
For the calibration we have made conservative adjustments to the uncertainty budget, for completeness and consistency with existing calibrations, with inclusion of contributions to uncertainty due to historical sensor drift and the reference instrument uncertainty. Further, we have selected calibration points with much higher density at the low range. This deviation addresses our only major criticism of the ISO methodology which requires 100 evenly spaced load points, meaning that the first data point for a standard 100 MPa penetrometer will be 0.75 or 1 MPa (for 75 or 100% of full range load cycles) – leaving no data points within the first 3 or 4 ISO cohesive soil strength categories.
Is there additional cost?
Whilst performing this calibration is time consuming, quality of calibration, data verification and data transparency are key to Lankelma’s market position, and valued by those who use and own the data, so an ISO calibration will be provided by default without extra cost. But fans of brevity be warned – these certificates are 15 pages long, or more!
Why does the CPT receive this calibration effort compared to other in-situ geotechnical tests?
Ideally, force sensors are designed to operate in the range 5 to 100% of full scale output, and with substantial overload capacity, where errors are small relative to the measured value. The cone penetrometer, however, is often required to obtain measurements over its full force range to target depth, whilst also maintaining high accuracy in the low range where measurements in lower strength soils are critical to design. This is readily achievable, but requires a detailed understanding of a penetrometer’s measuring capability, and QC procedures specific to the instrument type to minimise errors that occur in-use.
The other obvious driving force behind the ISO standard is the increased reliance upon CPT data for high value, high risk geotechnical structures, particularly for nearshore and offshore energy infrastructure, where measurements with verifiable QA/QC are required to reduce costly conservatism and waste.
Can I learn more?
The relative importance of information in the calibration certificate and of the field procedures can be alien to a non metrologist, including those proficient in CPT site work and data interpretation. This is partially address by the reported penetrometer ‘class’ and test ‘category’ according to the classification system set out in the standard. But this system is inevitably crude, and in many scenarios risks highly inefficient practice.
To assist users and specifies of the CPT to use this standard and interpret calibration results, we openly encourage you get in touch for advice, or to arrange a seminar or Q&A session, and learn how the options available can be combined for optimum results.
We will be publishing more information on ISO-22476-1:2022 in the coming weeks, so watch this space.


